Showing posts with label Tutorial. Show all posts

Wednesday, August 24, 2016

Shrimp Salad


 I know that summer is already winding down, but it's never too late to make a delicious and easy salad. And with Labor Day coming up, this would be a great addition to any picnic or BBQ. I love to eat it as a main dish with a great rustic bread or crackers, but it would also be great as a side dish! My recipe is pretty basic, which is why it's so easy, but if you want to you could add chopped onion, hard boiled eggs or maybe even some grape tomatoes. And, as for the dressing, I've also made it with the addition of a tablespoon of ketchup or mustard. Both are yummy.


My mom always used elbow macaroni in her shrimp salad, but my family prefers rotini.  Shell or bowtie would be excellent too.


1. Cut up your celery, thaw your peas, and drain the shrimp and olives. Place them in a large bowl and set a side. Boil the pasta for the recommend amount of time, but don't over cook, I like mine to have a little chew to it.


 2. Drain pasta, and place in the large bowl with the other ingredients.


3. Mix together the mayo, sugar and vinegar in a small bowl.


4. Mix the dressing into the large bowl and chill for a couple of hours or overnight.


Now your ready to enjoy with bread, for an easy meal that won't heat up the house! Delish!
Bye for now!

Monday, June 27, 2016

DIY Graphic Tee


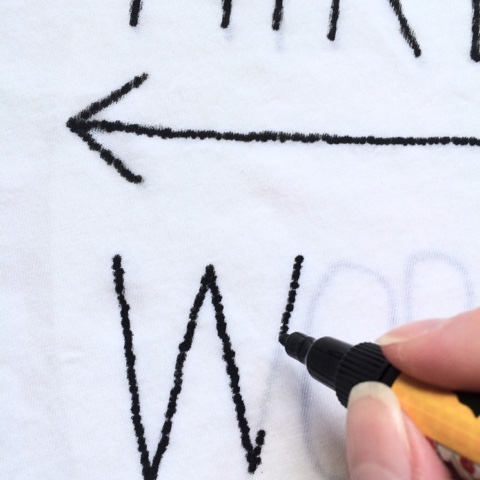
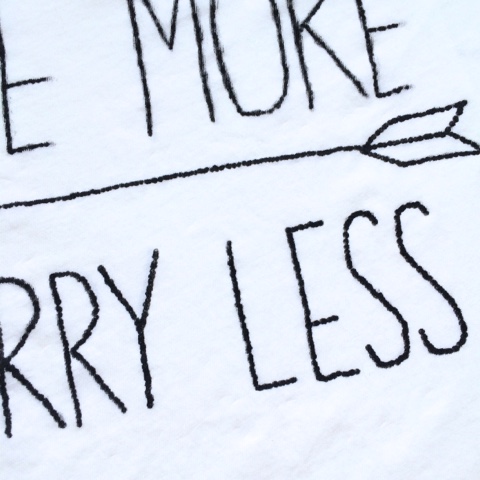
I've been on the look out for the perfect graphic tee for awhile now and just couldn't find exactly what I wanted. And then I saw this phrase and because I'm going to be doing a lot of hiking very soon, I thought I would try out using a fabric marker and see what happened. I bought a tee at Old Navy the other weekend when they were $5 and a black fabric marker at Michaels.  You want to make sure and wash the tee before beginning.


Then I laid it out flat on my work table and put a piece of foam core underneath (and in between layers) to protect the back of the shirt. You could use any piece of thick cardboard or poster board.


Next I drew out my design with pencil on a piece of paper and retraced with marker. I made sure I made the design the right size for the tee. You could also download a design from the computer and print it out if you want.


Then I placed that paper under the top layer and positioned it where I wanted it.


According to the directions for this marker, I  needed to shake the pen vigorously to get the ink to the point and press down on a scrap of paper a couple of times too.


I also laid down some weights to keep the tee from moving around as I traced the letters.


The tee is stretchy so I found that doing a stippling motion with the marker worked better then a brush stroke method. 


After letting it dry overnight laying flat it was ready to wear the next day. I haven't tried washing it yet, but I'm pretty confident it will wash well. 


This turned out even better than I thought, and I can't wait to wear it! If you try this I would love to see your results. Bye for now!


Tuesday, February 09, 2016

Gold Glittered Heart Mobile


My last Valentine tutorial I had some cutout hearts left over so I thought I would come up with another quick decoration, and this is what I came up with. I used the same gold glitter, glue, pink card stock, and baker's twine.


I like to use a Q tip to spread the glue out evenly, so the glitter goes on perfectly.


After they had dried, I glued the twine to the backs of the hearts, let it dry, and I was done.


I made sure to leave a bit of twine at the top and then just used a bit of washi tape to hang it.


Simple and sparkly, just the way I like it! Bye for now!

Tuesday, December 02, 2014

Woodland Deer Template

 I decided to make a wreath that I could use
for all seasons.
I wrapped a styrofoam wreath
with half white yarn and half light blue yarn.
Then I plan to just add accessories 
for each holiday or season.
For Christmas I made a cardboard deer myself
and added a vintage sign .
I love how it turned out!


Then I made more deer to go on my tree!
You may notice the mushrooms I started crocheting
last month.

If you like the deer and would like to make some yourself
here is the template.
I only ask that you use it only for your own crafting
not to sell.

Bye for now!

Friday, February 07, 2014

Lace Bookmark DIY

 Here is a quick little tutorial that you can use 
to make cute little bookmarks for gifts
for Valentines or birthdays or Mother's Day,
anytime!
 You just need lace ribbon,
(this is a perfect use for scraps!)
fabric stiffener or watered down glue,
brush,
and wax paper to work on.
 You can cut the lace first or wait till it's dry.
After drying, you can trim the ends with a 
scrapbooking scissors,
and use a punch to add decoration.
I also added a hole to one end and
threaded it with embroidery thread for a sash.
Aren't these pretty!
Bye for now!

Tuesday, January 07, 2014

Jam Jar Candle Holder DIY

 My hubby is a Bonne Mamon Jamaholic,
so I always have at least a couple of these cute jars around.
So I thought I'd make one into a sweet little candle holder.
With Valentines Day coming
I thought of using lace to dress it up.

 This is a super simple craft
and all you need is:
jam jar
glue
brush
lace
votive candle

 Cut your lace to fit around the jar,
I ended up using a narrower lace,
as it fit better.
Dilute you glue with a little water 
to make it spread easier and decoupage
the lace onto the jar.
 

 Then just add you votive!
I used a battery operated votive
I found in Target's dollar section
because I wanted to use it as a night light.


 Plus, with the fake votive you can put the lid on too!

Bye for now!

Wednesday, December 18, 2013

Chenille Stem Christmas Tree DIY


 Hi there! Here is a little tutorial to make
little Christmas trees with 
chenille stems and wooden spools.

You'll need green bump chenille stems,
brown chenille stems,
and wooden spools.
Fold the brown stem in half 
and twist the ends together.
Cut the green stems into sections of two bumps.


 Wind the bump sections around the brown stem.
As you work your way up the stem,
wrap the green piece around an extra time
to make the branches shorter.
By the time you get to the top of the tree 
you will be wrapping around about 5 times.

Before you wrap the last branch section around the tree,
cut a separate bump for the top and
wrap the last section around it to hold it in place.


 Then you simply insert into a wooden spool!
You can wrap ribbon round the spool if you like,
or you could skip the spool and use them 
as adornments on packages.
I also think they would be cute to leave up year round
especially if you leave the spools plain.

 Bye for now!


Monday, October 14, 2013

Candy Corn Pumpkin Tower

 Last week I decided to make a candy corn tower 
out of pumpkins to go in my kitchen!

 I had some fake pumpkins that I had from 
past years that were white.
 I cut a hole in the bottom of the middle and top pumpkins,
and then painted in the candy corn colors of  yellow,
orange and white.
Since they were going in my birdcage, 
all I had to do was stack them on top of each other.
But if was going to set them on the ground or a planter,
I would probably use a long dowel to hold 
them all together.
Bye for now!

Wednesday, October 02, 2013

Chenille Bump Pumpkin Tutorial

 Today I want to show you 
how to make these cute little 
pumpkins made with chenille bumps!
They will be perfect for Halloween and Thanksgiving!
 First, here are the materials you need:
*styrofoam ball approx. 6" around
*orange chenille bumps
(it takes about 16 bumps to go around)
*green chenille bumps
*glue (optional)
*wire cutters (optional)
 First, I take the ball and squish it
with the palm of my hand,
to make it flat on top and bottom.
Then I start inserting each bump,
one end goes into the top flat side
and the other goes into the bottom flat side.


 I just keep going around till I get it full and covered.
 I leave a bare spot on top,
that's where the stem goes.
Cut the green bumps in half.

 Insert a pencil into the bare spot,
and stick on of the green chenille halves into it.
If you want you can add a dab of glue to secure.
 They are really fast to make
and are so adorable.
I hope you try it out!
Bye for now!

Featured Post

Sketches of the Week

Still in a Christmas and winter mood with my art, and still working on my technique with gouache. It's a much trickier medium than I ...